

How To Repair Worn Leather Seats
Leather tin can be restored in two ways:
- Using the Leather Re-Coloring Balm. This is a unproblematic wipe on and buff off awarding, however, it requires the leather surface to exist absorptive in lodge for the balm to properly penetrate. Information technology also works if the surface coating has split up/cracked exposing a lighter color below. The advantages of using the balm are that it is cheap and easy to use, and the results are very pleasing. However, it only restores the color, if the leather is croaky, it will not actually prepare the cracks - just hide them with color. See the video above to see what you can expect.
- If the damaged expanse is not absorbent or the cracks are darker than the leather or y'all just desire to restore the leather to pristine condition, fixing all scuffs and cracks, and so follow the instructions provided beneath.
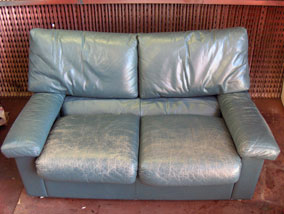
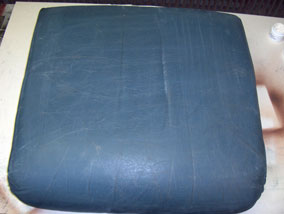
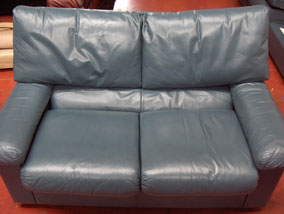
In this guide we will restore the two seater sofa shown in the photo on the left.
The leather is heavily cracked and so we volition be using Leather Binder, Flexifil and the Big Leather Colorant Kit to carry out the restoration.
If the Leather had little or no cracking, you would not require Flexifil, in this instance, skip the section of the guide on filling cracks.
All of the products mentioned in this guide can be purchased from this guide page, or on the relevant product pages on the site.
STEP 1:
The commencement footstep is preparing the leather ready for applications of color. Nosotros practice this to remove any waxes, oils or silicones that may be nowadays on the leather, not removing these could cause adhesion issues. Prepping the leather also removes the manufactured finish. If the leather is very muddy, clean it first with the Leather Cleaner.
Different prepping techniques can exist employed with similar results but we will bear witness you the most thorough way in this guide and explain the reasons for doing so along the way
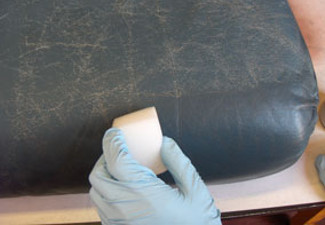
1. Practise the back & sides get-go. A lot of furniture these days accept finished splits on the back & sides and using a potent cleaner like the leather prep would strip the colour off so nosotros won't be using it on the sides. For the sides, all you need to do is wipe them down with some alcohol cleaner on a material. Non prepping the back and sides as thoroughly every bit the residue of the leather won't affect the end results, this is because the back and sides aren't actually used and then come under no, or very little stress.
2. Considering the seating cushions and other areas come nether more stress (wearable & tear) it is more than important to ready them. To practise this it is best to rub them with the Leather Prep and an Abrasive Pad, this application removes the leather terminate. However, because this leather is very badly worn, it is best to merely wipe the leather down with the Leather Prep and a cloth. The Abrasive Pad would make the dandy even worse in this example.
The leather is correctly prepped when y'all beginning to see color transfer from the leather onto the Annoying Pad or cloth. This indicates that the finish has been removed exposing the colour beneath.
iii. The above process will accept removed the manufacturers finish and any silicones that are soluble in solvents. There are however some silicones like spray on polish and waxes that aren't soluble in solvents, and then to remove these we need to use the Booze Cleaner. Afterward using the Leather Prep wipe the leather down with a cloth dampened in the Booze Cleaner and for ease of use yous could also spray the Alcohol Cleaner directly onto the leather. Now, wait 30 minutes for the prep to evaporate.
STEP 2:
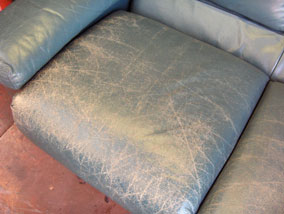
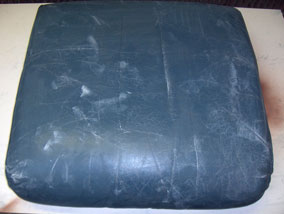
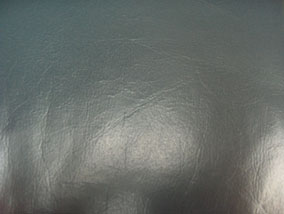
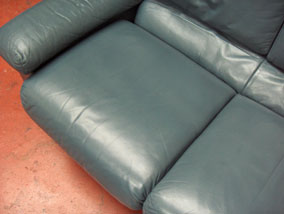
The above two photos show the seating absorber in very bad condition. The photo to the correct is an upwards-shut photograph of a section of the absorber. The cracks have occurred over twenty years of wear and tear on the leathers surface causing the pigment to 'crack' as the leather flexes. Regular applications of protection cream could have prevented this!
The process will be to fill the cracks and then colour the leather.
STEP iii:
Strengthening the leather with Leather Binder
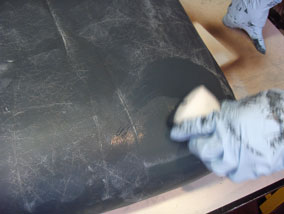
The Leather Binder is applied with a sponge and is captivated by the leather holding all the worn leather fibres together. Utilise approximately iii-5 coats to the unabridged surface, leaving time for each glaze to dry before applying the adjacent.
Note that information technology is important that excess binder that may build up around areas of stitching should exist wiped away before it dries.
Note that the binder will change the look of the leather slightly at this stage, in this example It may appear as though it has colored the cracks. All information technology has washed is darken them as they absorbed it. Do non think this has sorted the problem!
STEP 4:
Applying the Flexifil (Heavily Cracked Leather Only)
After the Leather Binder has strengthened the leather to foreclose time to come smashing; Flexifil is used to repair existing nifty.
Annotation: It is non suitable for repairing damage such as holes, true cat scratches, tears, cuts or burns, for areas that have suffered this kind of damage yous require the Leather Repair Kit.
To apply the Flexifil, only take a pallet pocketknife or spatula and utilise a small amount to any areas of cracking on the leather. Then, carefully run the edge of the pallete knife over the filled area to smooth information technology out and remove whatever excess. Once all of the bang-up has been filled, leave this to dry for 30 minutes and so take some fine sandpaper (1200) and smooth the area downwards.

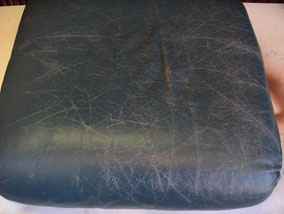
To the left is a photo showing a close up as earlier. This time you volition notice where the Leather Folder has filled in some areas and the Flexifil others.
Notation: It is fine to apply another glaze of Binder on superlative of the Flexifil if necessary. Even if y'all apply colour and remember it could be re-filled, it is ok to apply Flexifil on top of the color. This helps to achieve a smooth end.
STEP 5:
Applying the Leather Colorant
Shake the bottle of Leather Colorant for virtually 3 minutes to make sure information technology is well mixed. Cascade a small amount onto a sponge and rub into the leather. The idea is to sponge on a thin coat of colour working it into any gaps, creases and difficult to accomplish areas. Apply light pressure hither to work the colorant into the grain. If y'all apply too much pressure level you lot may get a cream of color on the surface, this is not a trouble, just wipe it away with the sponge (gently).
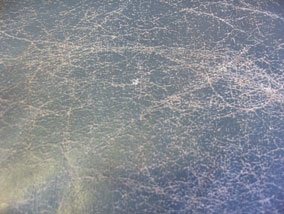
The image to the left is the before close up with a coat of color sponged on. Afterward applying ane base coat of color a thin spray coat can then exist applied to further enhance the finish on the leather.
The Leather Colorant dries naturally or you can speed it up with a hair drier.
STEP 6:
Spraying the color
Wait thirty minutes for the colorant to thoroughly dry so continue to spray the leather. Gear up your spray gun or airbrush and then spray the leather at a comfortable distance, not to over apply the color. It is all-time to practice a bit on a piece of paper to get the hang of spraying first. Spray the colorant on in thin layers. This avoids runs then makes for a nicer finish.
Because the colorant we're using is h2o based it takes a few minutes to dry. We therefore advise you to spray one area and so dry it using a hair drier. Doing information technology this mode reduces the hazard of runs. If you do encounter a run, just wipe it off with a cloth or sponge and then re-spray the area.
There is no correct number of coats that should be applied to the leather. Spray on one coat and dry out information technology off, then merely proceed spraying on a coat at a time until all the base color is hidden.
STEP 7:
Spraying the Leather Terminate
The Leather Finish is and so practical in the verbal same way as the colorant. Thin layers are the primal! We recommend spraying on 2 layers of sealant (glossy), and then 2 layers of Leather Finish as this gives a very strong blanket guaranteeing a very long life span of your job! The Leather Cease further enhances the experience and texture of the leather, information technology gives yous a lovely soft and delicate touch on, even if the leather was crude beforehand!
FINISHED Piece of work:
The above 2 images are of the seat thoroughly colored. As standard, the leather has a slight shine to information technology. This tin be either increased using a gloss finish, matted down using a matt finish or kept the aforementioned using a satin finish. In this case, we used a satin stop to match the original sheen.
Nosotros have a full range of products for leather restore and dying the leather of everything from furniture to shoes to saddles visit our Leather Restoration & Dyes section.
-
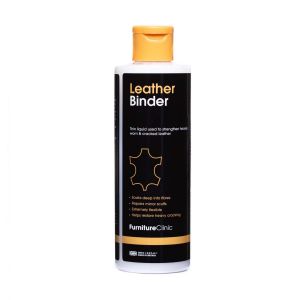
Leather Binder
Sparse liquid used to strengthen heavily worn & cracked leather.
From $17.95
- Soaks deep into fibres
- Repairs minor scuffs
- Extremely flexible
- Helps restore heavy swell
View Product
-

Leather Re-Coloring Balm
The Leather Re-Coloring Balm restores the color of all leather items. Perfect for faded or scratc...
From $29.95
Quickly and easily restore color to all absorbent leathers with our best-selling Leather Re-Coloring Balm. Backed by the prestigious Good Housekeeping Seal, this product makes leather restoration easier than you could ever imagine.
View Product
-

Leather Colorant
Safe to apply and not-flammable leather colorant used for repairing & restoring leather
From $21.95
- Extremely Flexible: Information technology can withstand 100,000 flexes.
- Hard wearing & loftier color coverage.
- Soft, delicate & natural look & feel.
- Bachelor in xvi standard colors or i of over x,000 colors in our database.
- Color matching service to match your leather exactly.
View Product

How To Repair Worn Leather Seats,
Source: https://www.furnitureclinic.com/e-learning/2019/05/23/how-to-restore-leather/
Posted by: stankoades1944.blogspot.com
0 Response to "How To Repair Worn Leather Seats"
Post a Comment