

How To Repair Deck Railing
Repairing Decks and Railings
Updated: Jun. 30, 2022
Adept fixes for common problems
Easy fixes for common deck problems like rotten boards, wobbly railings and loose nails. Plus, see how to stiffen a bouncy, wobbly deck
You might too like: TBD
- Time
- Complexity
- Cost
- A full day
- Intermediate
- Varies
Supervene upon cleaved deck boards

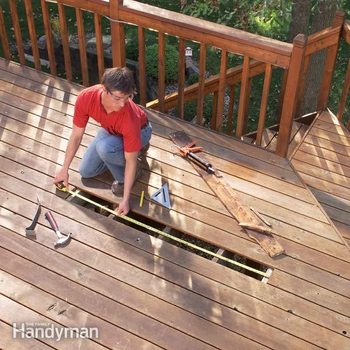
Photo 1: Cut out the bad board
Draw a square line on the decking to ane side of a joist beneath. Cut the deck board with a jigsaw. Pull the decking nails with a cat's paw.

Photo two: Add cleats to back up the new board
Predrill three clearance holes in two xvi-in. treated forest cleats. Apply construction agglutinative, agree each cleat tight to neighboring deck boards, and spiral one to the joists at each end of the repair.

Photo 3: Install the new board
Cut the replacement lath to length. Then tap it into place with a hammer and a wood block. Predrill pilot holes and bulldoze a pair of 2-1/2-in. deck screws (or galvanized nails) into each cleat. Fasten at all other joists as well.
You don't have to let a divide, rotted or otherwise ugly deck board ruin the appearance of your deck. Just replace it and in a yr or and so the replacement will blend right in.
You unremarkably don't have to replace an entire board. Just make sure to cutting out a piece that spans at least 3 joists. The residue should be at least that long. And don't hesitate to cutting out a little extra to keep adjacent decking joints staggered for better appearance.
The most difficult office is cut out the damaged section cleanly (Photo one). Don't try to cutting directly over a joist. Instead, cut to one side and screw on a cleat to support the new decking. It's a fairly hefty cutting for a jigsaw, so use a precipitous, strong blade to keep your cuts as straight and smooth as possible.
Predrill screw holes in the cleats so they pull tight to the joists (Photo 2). Also pull up on them so they butt tightly against the decking on each side equally y'all screw them in.
Cut the new deck board from matching material, both in thickness and wood type. It'll look unlike initially, but it'll blend in after a year or so, especially if you clean and reseal or stain your deck. Cutting the new deck board to fit snugly, then screw or nail it into place (Photo 3).
Strengthen wobbly posts

Photo 1: Drill bolt holes
Drill 2 1/2-in. holes through the post and framing. Beginning the holes to prevent splitting the post. Angle the pigsty to avoid joist hangers.

Photo 2: Drive in the carriage bolts
Tap in 1/2-in. carriage bolts, shim if necessary to plumb the mail service, and install washers and basics. Tighten the nuts until the bolt heads are set flush to the post.
Yous don't take to alive with loose, wobbly railing posts when a couple of bolts volition make them safe and solid. Mensurate the thickness of the post/framing assembly, add 1 in. and purchase 1/2-in. diameter galvanized carriage bolts that length (plus a nut and washer for each) from whatever hardware shop or habitation center.
Drill the 1/ii-in. clearance holes well autonomously, 1 virtually i-1/2 in. from the top of the framing and one almost one-1/2 in. up from the bottom of the mail (Photo 1). Y'all may accept to angle the holes slightly to avoid joists, framing anchors or other obstructions. If your drill bit isn't long enough to become through the post and framing, get a long spade bit. Versions up to 16 in. long are available at home centers and hardware stores.
Near posts are held fairly plumb past the railing, but check them anyhow with a level and tap in shims to straighten them if necessary. Don't over-tighten the bolts; the heads volition sink deep into soft forest without much attempt.
Stiffen a boisterous deck

Photo 1: Tap in snug-fitting blocks
Snap lines for blocks every three to 4 ft. forth the joist span. Measure and cut the blocks to fit tightly. Tap them into place in a staggered blueprint.

Photograph two: Nail blocks in identify
Foursquare each block to the joist and drive three 16d galvanized box nails through the joists into each stop of the block. Repeat for each row.
A deck that bounces when you walk beyond it won't experience stiff and solid, fifty-fifty if it meets structural requirements. The cause is usually long joist spans betwixt beams or between a beam and the firm.
To stiffen a deck, you lot have to exist able to get to the framing underneath. Y'all tin can add another beam, forth with posts, to back up the joists. However, this is a big job. We recommend that you showtime add together rows of solid blocking every 3 to four ft. along the bridge (Photo one). Run the commencement row down the middle of the span, cheque the deck for bounce, then add rows to further reduce information technology.
Use treated lumber blocking that'due south the same size as the joists (usually two×8 or 2×x). Install the blocking in rows along a chalk line snapped at a right angle to the joists. You'll have to measure and cut each cake separately to get a snug fit, since the joists are never exactly the aforementioned distance apart. Staggering the blocking in a step pattern (Photo 2) allows yous to easily drive nails from both sides, rather than having to toenail.
Replace loose, popped nails

Photo 1: First with a diagonal cutter
Grab slightly protruding nails directly under the caput with a diagonal cutter. Scroll the cutter back onto sparse blocking to pry the blast up slightly.

Photo two: Yank the nail with cat's paw
Tap the hook of a true cat's mitt under the nailhead and lever the nail upward. Finish pulling with a hammer or pry bar. Protect the deck board with a shim or thin block.

Photo 3: Replace the blast with a screw
Stand on the deck lath to concord it downward. Then drive a 2-1/ii in. deck screw down into the former smash hole. Set the screwhead affluent to the surface.
Decking swells and shrinks as it goes through repeated cycles of wet and dry out seasons. This frequently causes nails to loosen and popular upwardly above the deck boards. You tin drive them down once more, but chances are that's only a short-term solution. They'll probably popular up again afterward a few years. The long-term solution is to remove the popped nails and replace them with deck screws.
The trick is to pull the old nails without marring the decking. Always use a cake under your prying tool (Photos i and ii). And work on tough-to-become-out nails using several steps. A diagonal cutter works well for nails that only protrude slightly (Photo 1). The slim jaws can skid nether the caput. Yous'll only enhance the blast a slight amount, and so you may accept to repeat this process two or three times. In one case the nailhead is loftier enough, you tin can grip it with a cat's hand or hammer claw without marring the deck lath (Photo 2). Exist sure to apply thin wood blocks to protect the decking. Modest dents will disappear when the forest swells afterwards the side by side rain.
At that place'due south no need to drill a pilot hole if you lot send the screw down the old nail hole. Nonetheless, one drawback of screws is that their heads are larger than nailheads and can be unsightly. Nosotros recommend that you lot purchase deck screws in a color that most closely matches the anile decking.
Solutions For Stubborn Nails
If the head breaks off a stubborn nail and you can't become it with a pry bar, attempt pulling it with locking pliers. Grip the nail tip and whorl the pliers over to become information technology going. If the nail shank breaks off, don't worry. Just drill a pilot pigsty beside the blast and bulldoze a screw. The screwhead will cover the nail.
Take out the sway with an angle brace

Photo i: Add diagonal bracing
Cut and blast a treated 2×iv diagonally from corner to corner under your deck. Bulldoze two 16d galvanized nails at each joist.
Some otherwise solid decks tend to sway or wobble every bit you walk across them, especially decks resting on tall posts 4 or more than anxiety in a higher place the ground. Angle-bracing the posts is 1 good solution to this trouble, but the braces oft look tacky. Instead, install an angle caryatid underneath your deck. Information technology'southward a virtually invisible fix that all but eliminates sway.
If your longest ii×4 doesn't bridge the entire distance, don't worry. Add a second 1 starting from the other corner and run it back aslope the outset, nailing information technology to at least 2 of the same joists. Accept a helper concord the 2×4 in place while you bulldoze the first nails. Driving 16d galvanized nails upwards will requite your hammer arm a workout!
Required Tools for this Project
Take the necessary tools for this DIY project lined up earlier you showtime—you'll salve time and frustration.
Required Materials for this Project
Avoid last-minute shopping trips by having all your materials ready ahead of time. Here'southward a listing.
Originally Published: June 20, 2022
Source: https://www.familyhandyman.com/project/repairing-decks-and-railings/
0 Response to "How To Repair Deck Railing"
Post a Comment